How it Works
Document Templates includes two main workflows:
- It provides the possibility to create document/spreadsheet files by picking a template and providing context data.
- Template managers can upload templates and their related metadata.
Both processes are described in detail further down.
Desktop Client templates
It is important to understand the compatibility of the templates handled by Document Templates with templates from the Desktop Client. In order not to be restricted by the limited syntax used in the desktop client templates, these templates use Jinja as syntax language. This has the following consequences:
- Templates uploaded in the web client can not be used in the desktop client.
- Desktop client templates can only be used to generate documents in the web client if enabled in the configuration. This is only recommended after extensive testing to ensure the rendered result matches your expected result. More information on what is not supported can be found on the troubleshooting page.
- Desktop client templates can be uploaded to the web client and migrated. It is highly recommended that migrated templates are downloaded after it has been migrated to verify its correctness and manually adjust syntax that could not be automatically migrated.
When uploading and migrating desktop client templates, you create a copy of the template which means double maintenance if the template should still be used in the Desktop client.
Excel templates
In addition to Word documents, Document Templates supports .xlsx and .xlsm spreadsheet templates. The same Jinja syntax used for Word templates can be used inside cell values to insert merge codes.
As soon as a spreadsheet contains merge codes, it is processed by the template engine instead of being rendered as a regular workbook. The template engine only implements a subset of the Excel feature set, so some features become unavailable or behave differently than they would in Excel itself. See Limitations in Excel templates with merge codes on the troubleshooting page for the full list.
Note that the template engine evaluates Jinja expressions cell-by-cell, and that for-loops are not supported in spreadsheet templates.
Preparing templates
Feature support by template format
Some authoring features are only available in Word templates because the underlying template engine implements a smaller feature set for Excel.
| Feature | .docx |
.xlsx / .xlsm |
|---|---|---|
| Merge codes (variable expressions) | ✅ | ✅ (per cell) |
| Cross-cell expressions | n/a | ❌ |
for-loops |
✅ | ❌ |
Conditional expressions (if/else) |
✅ | ❌ |
| File / image properties | ✅ | ❌ |
See Limitations in Excel templates with merge codes on the troubleshooting page for the full list of Excel-specific limitations.
Jinja
The templates have to follow the syntax rules of Jinja to be rendered correctly. Please read the Jinja documentation for a complete feature overview. This section covers some common use cases for Document Templates and shows examples of how to solve them with Jinja syntax. Jinja variable expressions will also be referred to as merge codes here.
There is currently no assistance when writing Jinja templates in Word or Excel, as far as we know. Therefore the correctness of the merge codes and the syntax has to be manually ensured.
This .docx template contains some examples.
In order to render the correct values in templates, the merge codes have to be in sync with the database lime type structure. The examples below assume the following database lime type structure:
Example database lime type structure
The structure is defined in a simplified DSL format.document:
_label: document
document:
type: file
comment:
type: string
deal:
type: belongsto
related: deal
deal:
name:
type: string
value:
type: decimal
totalvalue:
type: decimal
company:
type: belongsto
related: company
orderitems:
type: hasmany
related: orderitem
probability:
type: decimal
person:
type: belongsto
related: person
company:
name:
type: string
buyingstatus:
type: option
options:
- notinterested
- prospect
- active
- excustomer
defaultvalue: prospect
orderitem:
name:
type: string
price:
type: decimal
currency:
type: string
picture:
type: file
person:
name:
type: string
allergies:
type: set
Merge code variables
The root of the Jinja context sent to the rendering of the templates is always an object of the configured document lime type (see the Configuration section). All properties of that lime object as well as properties of all related lime objects can be accessed.
Here are some examples:
{{ comment }}{{ deal.value }}{{ deal.company.name }}{{ deal.company }}
Merge codes that end on a relation field (e.g. {{ deal.company }}) will render the descriptive of that object.
The id and descriptive fields of lime objects are also accessible.
Note
There is a limitation with the id value on the document lime object. Since the document template generation is run before the lime object has been saved to the database, {{ id }} will not render a valid ID of the document lime object.
Pre-defined merge codes
A set of pre-defined merge codes are available when generating documents, accessed through the context variable:
context.today— returns a date object with the current date, excluding time (2021-10-27 00:00:00+02:00).context.now— returns a date object with the current timestamp (2021-10-27 15:42:50+02:00).context.active_user— returns the coworker object of the user generating the document.
Formatting
Variables can be rendered in a specific format by adding filters. Filters are used within a variable, separated by a pipe (|) character like this: {{ <merge>.<code> | <filter> }}. Check out this list of built-in Jinja filters.
As an example the built-in sum filter can be very handy.
To summarize the value of the price property on a list of order items on a deal, use this syntax:
{{ deal.orderitems | sum(attribute='price') }}
Date and time
Filters for formatting and manipulating dates and time are included. Further information and examples can be found here.
Numbers
Filters for formatting numbers are included. Further information and examples can be found here.
Lists
Whether you want to show all order items in an offering or list achievements in a certificate, there are many use cases where iterating through a list is needed. One example would be:
{% for orderitem in deal.orderitems %}
{{ orderitem.name }}: {{ orderitem.price }} {{ orderitem.currency }}
{% endfor %}
Rendering lists into a table is slightly different. You will need to add an extra tr in the opening and closing for loop tags. For example:
| Name | Value (SEK) |
|---|---|
{%tr for orderitem in deal.orderitems %} |
|
{{ orderitem }} |
{{ orderitem.price }} |
{%tr endfor %} |
You can find an example of this in the .docx example template.
For more built-in list functionality read this section in the Jinja documentation.
Conditional expressions
Conditional expressions are useful when some information should only be rendered in the document under certain conditions.
For example if some extra information should only be available for prospects:
{% if deal.company.buyingstatus == 'prospect' %}
This is a paragraph about how amazing your company is.
Existing customers already know that.
{% endif %}
Option and Set Properties
Option and Set properties work a little differently than other fields because their values have labels with translations. These fields define keys and labels for each value. In both the web and desktop client, when a specific key is selected for an option or set field, the correct label is shown in the user's language.
The below examples assume:
- A template with
en_USas default locale, - The company lime type's
buyingstatusoption property has an optionnotinterestedwith the labelsNot interested(english) andOintresserad(swedish), - The person lime type's
allergiesset property has the optionsvegetarianandlactosewith labelsVegetarianandLactose(english) respectively
By default in document templates, option and set fields will just render their key(s).
{{ deal.company.buyingstatus }}
notinterested
{{ deal.person.allergies }}
vegetarian, lactose
To render the labels, use the localize filter.
The below example will render the labels with the template's configured locale. If there is no label for the configured locale, it falls back to the default language of the application.
{{ deal.company.buyingstatus | localize }}
Not interested
{{ deal.person.allergies | localize }}
Vegetarian, Lactose
You can override the template locale on a case by case basis by using the locale argument.
{{ deal.company.buyingstatus | localize(locale="sv_SE") }}
Ointresserad
Set properties have some additional use cases.
{% for allergy in deal.person.allergies %}
- {{ allergy | localize }}
{% endfor %}
{% if "lactose" in deal.person.allergies %}
Below is a list of lactose free alternatives you may request

- Soy milk
...
{% endif %}
Info
Although locale (which contains a language code such as sv and a country code such as SE) is used for getting the label for set and option fields, the CRM only stores a label for each language, so the country part of the locale will have no effect on the rendering of the field.
File properties
File properties are supported as long as they contain images.
{% for orderitem in deal.orderitems %}
{{ orderitem.picture }}
{% endfor %}
The list of supported image types is currently limited to:
- Windows Bitmap (.bmp, .dib, .rle, .bmz)
- Graphics Interchange Format (.gif, .gfa)
- JPEG File Interchange Format (.jpg, .jpeg, .jfif, .jpe*)
- Portable Network Graphics (.png)
- Tag Image File Format (.tif, .tiff)
A set of filters for controlling images is also included. See Image filters for details.
Managing Templates
The templates are managed in Lime Admin. In Lime Admin under Settings > Document Templates you will find the interface for configuring Document Templates as well as upload your
templates so they can be used when creating documents in the Web client.
For a breakdown of this interface take a look at the configuration page.
Migrating Templates
Desktop client templates can be migrated automatically by uploading them in Lime Admin. The flow for migrating a template is as follows:
- Upload a desktop template in Lime Admin
- If the template contains desktop merge codes, you will be prompted to either automatically migrate the template or upload it as is.
- Detection of desktop template merge codes is not perfect, therefore you have the option to skip the migration if you know that your template does not contain merge codes. Otherwise, you should choose to migrate the template and the desktop merge codes should be replaced with the equivalent Jinja merge codes.
- After migration, download the migrated file and verify that the document has been migrated correctly. The automatic migration process does not support all desktop merge codes.
- If the template was not migrated correctly, update the remaining desktop merge codes manually and reupload it in Lime Admin.
Migration issues?
If you are having issues with migrating templates, check out the troubleshooting page.
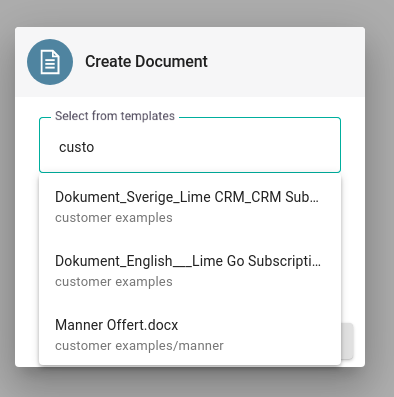
Apply templates
As long as document templates are enabled, template support is built into the workflow whenever someone creates a document. You can then either upload an existing file or pick an available template. The list of templates shown in the picker can be configured to include desktop client templates. Furthermore, metadata from either Lime Admin or the Desktop client template manager are displayed and searchable.
Before saving the document, fill out the rest of the form with related information. This related information is used to populate merge codes in the template when rendering the final document.